The Annotation Editor — tools, selection, section boxes, measuring
This is the same editor everywhere you annotate: a photo or plan page inside an IDR, and every page of a document builder (submittal packages, calc documents). What you learn here works in both.
The toolbar, left to right
On a narrow window the ribbon scrolls sideways (trackpad, mouse wheel, or a finger), and an arrow appears at whichever end has tools hidden past it; click the arrow to bring them into view.
- Select ▾ — the arrow. The caret opens selection modes (see below).
- Pan — drag the page. On touch, one finger pans only in this tool; two fingers pinch-zoom anywhere.
- Rectangle · Ellipse · Cloud · Cloud+ · Text · Count · Arrow · Freehand · Stamp — drawing tools. While any drawing tool is active your strokes go to the page even over calc boxes.
- Line ▾ — Line, Polyline (open), Shape (closes). Typed entry: the command bar below the toolbar takes run / rise in feet (± buttons for negatives), Set start, then Apply; for polylines, add vertices one at a time.
- Measure ▾ — Area, Length, Count, Calibrate, and the tally panel.
- Insert image — a photo from your camera or library, placed on the page as a movable picture.
- XS — a cross-section box (below).
- Lock — section boxes locked/unlocked.
- ? — this guide. 🛟 — report an issue from right here.
Selection modes (Select ▾)
- Single select — tap one item; drag on empty space for a marquee; Shift adds on a keyboard.
- Add to selection (continuous click) — every tap toggles an item in or out of the set, no Shift key. Built for phones and tablets: tap the five segments you want, then Delete, Mirror, or drag them together. Esc clears the set. The caret glows amber while this mode is on.
Tap a selected line, polyline, or shape to show its vertex nodes; drag a node to reshape it. The live readout shows length, rise/run, and slope in calibrated units.
Add a vertex: with a mouse, move the pointer onto a segment and a small + appears at its midpoint; drag it and the new vertex follows you. On a touch screen every segment shows its +. You can also right-click a segment and choose Add vertex here.
Remove a vertex: click its node to select it (a red ring appears), then press Delete, use Delete vertex in the floating bar, or right-click the node and choose Delete vertex. While a node is selected, the Delete key removes only that node; to remove the whole mark, use Delete shape in the floating bar. Alt+click removes a node at once; on a touch screen, press and hold it for half a second. A line keeps at least 2 vertices, a closed shape 3.
Copy and paste — across pages and browser tabs
Select marks, plan sections, text or pictures and press Ctrl+C (Cmd+C on a Mac). Press Ctrl+V on another page of the same document, on a page in another document, or in another browser tab — whatever you copied last is what pastes, whichever tab you copied it in. Each paste lands slightly offset from the last and stays selected, so you can drag it into place. Pictures you paste keep showing after the page saves and reopens. If your clipboard holds a screenshot, Ctrl+V pastes the screenshot instead. Ctrl+X cuts and Ctrl+D duplicates in place.
Text borders and node dots
A text box's border keeps a little space around the text (about a third of the font size), and the box's background fills that space. A pasted text box shows its border straight away. A measurement's lines and its label are styled separately. Select any part of the measurement — the line or the label — and the Style panel shows three sections: Lines (the dimension and leader lines: colour, width, dash, opacity), Label Text (the label's size, font, colour, alignment and background) and Label Border (width, colour, solid / dashed / dotted). Changing one never changes the others. The label keeps its border when the page reopens. While you place points on a line, polyline, shape or area, each placed point shows as a small dot that stays the same size on screen however far you zoom in.
Calibration and measuring
Measurements read in real units once a page is calibrated (Measure ▾ → Calibrate, or a sheet that is born calibrated). Calibration persists per page. On an exaggerated sheet (see section boxes) the tools correct for the exaggeration automatically — you never divide by the factor yourself.
Measurement text and its leader. Drag a measurement's text away from what it measures and a leader line follows it back to the middle of the dimension line. A measurement too small to hold its own text gets its text placed outside, with a leader, when you draw it. Move a whole selection (dimensions, text and leaders together) and the leaders keep their size; the dimensions stay where you moved them when the page reopens.
Cross-section boxes (XS)
A gridded offset × elevation section you drop onto any page — several per page. Pick a phase preset (or type a title), a station, and a vertical exaggeration (1× none, 2×, 5×, 10×); offsets and elevations live behind Adjust grid.
- The box has its own coordinate system. Strokes that start inside it measure with the box's scale and exaggeration; outside it, the page scale applies. The status bar names the box under your cursor.
- Drawing inside: use Line ▾ or Measure ▾ as usual. Draw existing ground and each placed layer as closed shapes; hatch-fill layers; the Measure tool returns areas in square feet for your volume calculation.
- Moving and resizing the box: boxes are locked by default so selecting strokes over them is effortless. To get the box: long-press it (touch), double-click it (desktop), or Select ▾ → Select whole section. Resize freely — the strokes scale with the grid and their measured values update. Click anywhere else to re-lock.
- Copy/paste between boxes keeps the offset and elevation, not the pixels — a section drawn at 5× pastes correctly into a 2× box.
- Mirror across centerline (toolbar, with a selection) — mirrored copies on the other side of the box's ℄. Shapes flip; text moves.
- Phases: make one box per phase (Initial grading → 9" PGS → 3" topping partial → final) on one page, or one full-page template per phase via Add page → Cross-section template.
Calc boxes on the page
Calc boxes and calc tables sit on top of the page. Their gear sets text size, spacing, and background — choose Transparent to cloud or highlight a number inside a box. Copy a box or table with Ctrl+C and paste it into any other document builder (values are copied, not linked). See the Calculation System guide for the math. The page thumbnails in the rail show calc boxes too; a thumbnail catches up after the page saves, or after a box is added, moved or removed.
Saving and the record
Every edit autosaves. Pages keep their calibration and their section boxes. Exports render exactly what you see, including section boxes and transparent calc boxes. Submitted packages are flattened and permanent.
Pan: P, H, or hold the mouse wheel
Press P or H to switch to the hand and drag the sheet. With any tool armed, hold the mouse wheel button and drag to move the view without drawing anything; let go and the tool you had is still armed. Ctrl + wheel over the drawing zooms it.
Restyle several marks at once
Select more than one mark (drag a box around them, or Shift-click each) and change the text size, colour or line width: every selected mark takes the change. A callout or a dimension restyles as a whole. A selected line takes its width from the Width slider in the Style panel.
Rename an annotated photo or page
An annotated photo starts out named after its file (for example "Annotated Photo — IDR_20260915_111314_1.jpg"). Open it, choose Rename beside the name at the top of the editor, type a name you will recognise later (for example "Subgrade fabric, Sta 21+24 to 21+55"), and Save. The new name is what you search for when you attach a drawing to an activity note, and it follows the page into a submittal package built afterwards.
A page on an accepted report, or one that carries a signature, cannot be renamed. To rename a whole document, use Rename this document in the document menu.
A submittal package from several groups of days
In the pay item's Ledger, ⋮ → Build submittal package… asks for a pay period. One From/To covers a single stretch. For a submittal that covers, say, work in August and work in October but not the September days in between, fill the first range, then + Add another range and fill the second. Days in any of the ranges are included; days between them are left out. Each range is at most 90 days and ranges may not overlap. The package's default title lists every range (you can rename the package afterwards), and so does the Completeness Note when one is written.
Plan sheets in a submittal package stay sharp
When a pay item's submittal package is built, each marked-up plan sheet, PDF page, blank page or marked-up photo page comes in as a real page with the package's own copy of your marks; a plan sheet stays pinned to the plan revision it was drawn on. Zoom in as far as you like: it stays as sharp as the plan viewer. You can adjust the marks in the package without changing the original drawing, and editing the original later does not change a package that is already built.
Every mark on those pages can be moved and edited in the package. Three things still come in as a picture: a page that carries a signature (so the signature cannot be altered), the field photos and material tickets the package gathers on its own, and a page whose original is no longer on file. The pages come in a fixed order: the marked-up plan sheets, the calc sheets, the field photos, then the material tickets last, and the Completeness Note at the end when one is written. A package built before this change keeps the order it was built with; only new builds use it.
A package built before 5 October 2026 keeps its picture pages. Regenerate the package to get sharp plan pages; the old package is left as it was.
Reporting a problem
Press 🛟 in the toolbar (or Report an issue… in the AI assistant's menu). Two sentences are enough — the page, your device, and the last errors are attached for you, and you get a reference number.
Signature box — an electronic signature with a certification stamp
Use the Sig button on the toolbar to place a signature box on a sheet (a Tollway A-14, a return-of-material form, a field ticket). Size and position it, then double-click it to sign. Two ways to sign, one record:
- I am signing — you sign as yourself.
- Someone else is signing on my device — a contractor or agency representative signs on your tablet in your presence. You are recorded as the witness, and the statement they accept says so.
The signer draws or types their signature, gives their printed name, title and who they sign for, and accepts the consent statement. When they press Sign and record, the platform writes the signature record first and then draws the box from that record: the signature, a signature line, and a certification stamp with the printed name, the UTC instant, the mode, the witness, the record id and the first characters of the page hash. The stamp is never typed by a person, and the signed box is locked — it cannot be moved, resized or deleted with the ordinary tools.
What the hash is. At the instant of signing the platform hashes exactly what the signer saw: the sheet's source identity and every markup beneath the box. If the page is changed afterwards, the box shows PAGE CHANGED AFTER SIGNING the next time it is opened, and the exported PDF's Signature certificate page (appended after the sheets) lists every signature with its hash, consent statement, witness and time.
What it is, and is not. This is an audit-trail electronic signature of the kind ESIGN and UETA recognise — intent, consent, attribution and integrity are all recorded. It is not a certificate-based (PKI) signature. Whether a given agency accepts an e-signed version of a given form is that agency's acceptance rule, not a security requirement — check the agency's guidance for the form.
If you do not see the Sig button, the signature record is not enabled on your database yet (it is turned on by a migration); ask your administrator.
Pictures, PDF layers, photo frames and page rotation (October 2026)
Rotate a page

Rotate ↺ / Rotate ↻ sit beside Move at the top of the page. Each turns the active page a quarter turn, the marks on it turn with it, and the orientation is saved with the page — the document reopens the way you left it. Image pages turn their picture, blank pages turn their box, and a plan or PDF page keeps its source and remembers the turn, so the export prints it the way you left it. A page that carries an electronic signature is a record and does not rotate.
Where a new page goes
Open Add page and the first row asks where the new page goes: After page N (the page you are on) or At the end. Every kind of page honours it — blank, picture, plan page, PDF page, Excel, cross-section, a dropped file — and the choice is remembered on this device. Dropping a file between two thumbnails in the page rail still puts it exactly there.
Lay a picture or a PDF page on a drawing
Paste a picture, drop one on the drawing, or use Insert image. It lands as a picture you can move, scale and rotate. Opacity is on the Style panel: select the picture and the slider fades it — the way to lay an aerial or a map over a plan sheet and still read the sheet beneath. The stroke controls draw the picture's border.
A PDF from your computer works the same way: drop it on the drawing (or paste it, or pick it with Insert image) and one page of it is placed as a picture. A PDF with several pages asks which page. Where you drop decides what you get: on the drawing, a layer on the current page; on the page rail, the PDF imported as pages, as before.
A picture selects by its whole box, so a map laid over a drawing would catch every click meant for the lines under it. Select the picture and the bar at the top of the page offers Lock picture (it can no longer be clicked or moved, so the marks beneath it can be), Send to back and Bring to front. When nothing is selected, a chip at the top of the page reads Unlock N locked pictures — that is the way back. A PDF page you lay on a drawing remembers where it came from: the file name, the page number and a fingerprint of the file travel with the picture in the record.
If a page opens with a red banner saying it loaded fewer objects than its record holds, something on it could not be loaded (most often a picture whose link has expired). Dashed red boxes mark where. Nothing you draw on that page is saved until you press Reload and it opens whole — the platform will not overwrite a record with a page that is missing part of it.
Text boxes
Placing one: with the Text tool, click to drop a box at the default size, or drag to draw the box as wide as you want; the text wraps inside it. The first box starts at a size that reads well at the zoom you are working at; once you pick a size in the Style panel, new boxes keep it.
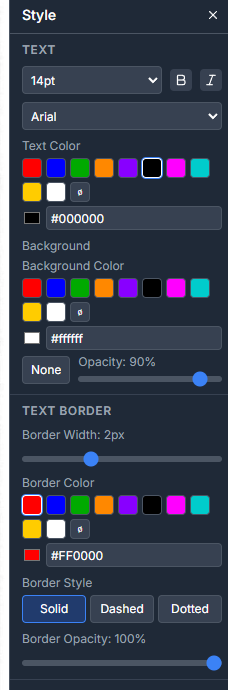
Select a text box and the Style panel shows its Text section: size, bold and italic, font, colour, alignment (left, centre, right, justify) and Background — a colour, None for no box, and an opacity slider. The Text Border section draws the edge. A new text box starts on white paper so black text can be read.
Photo frames

Select a framed photo (a leader with a photo) and the on-sheet bar offers:
- the shape of the frame — Rectangle, Rounded, Circle, Oval;
- Frame moves picture (the default) or Frame crops (picture stays) — with the first, drag the frame and the picture comes with it, scale the frame and the picture scales with it; with the second, the frame alone moves or scales and you are choosing which part of the picture shows;
- Fit picture — scale the picture to fill the frame and centre it;
- the arrowhead — Solid, Open, Dot, None.
A circle frame scales from its corners only, so it stays a circle. To place the picture inside the frame by hand, double-click the frame: the whole picture shows behind it while you move and scale it; double-click again, or press Escape, to set it. Selecting the frame also sets it.
Leaders
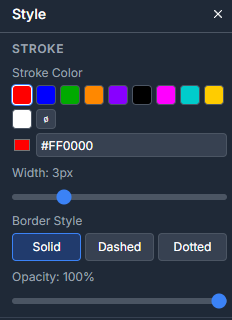
Select a leader and the Style panel's Stroke section sets its colour, width, dash and opacity; the Arrowhead section sets the head's size, from half to three times the default.